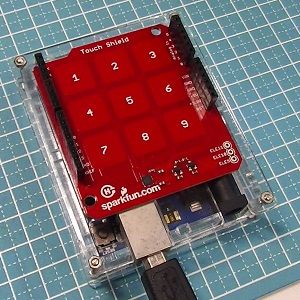
The SparkFun Touch Shield is a keypad shield that has 3X3=9 touch keys on it.
When you use this shield, it matters that how you make software for it. Although a sample sketch is offered at GitHub, this sketch is not provided in the form of a library and the sketch is difficult for a beginner to use since it requires rewriting ISRs (interrupt service routine) in order to modify it to suit it to the user's needs.
So I developed the TouchShield Library with which you can easily make a sketch that runs on the Arduino Uno and that handles the Sparkfun Touch Shield.
The library is distributed under the LGPL (GNU Lesser General Public License), so you can use it either personally or in commercial use. However, be sure to show its author when you redistribute it.
When I developed this library, I used a part of the sample sketch that Sparkfun distributes at Github.
This library is a non-official library that I developed regardless of Sparkfun, so do not query Sparkfun even if you find some fault in it.
You can download the TouchShield Library with the link below.
This Library runs on the Arduino Uno. Operational test is done using the Arduino IDE 1.0.6, 1.6.11 and 1.7.8.
Known issue:The Touch Shield Library doesn't work properly with the Arduino IDE 1.7.10. The cause is under investigation.
I'll show you how to install the library taking the Arduino IDE 1.6.11 as an example.
Notice:The menu structure, etc. may be different with other versions of the Arduino IDE.
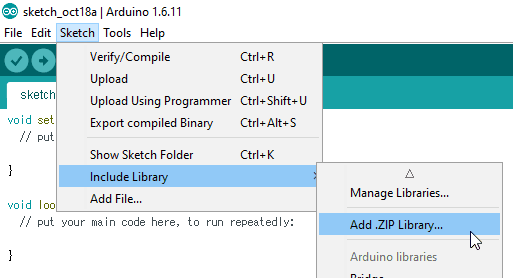
First, Run the Arduino IDE and select the Sketch > Include Library > Add .ZIP Library... menu. (See figure 1)
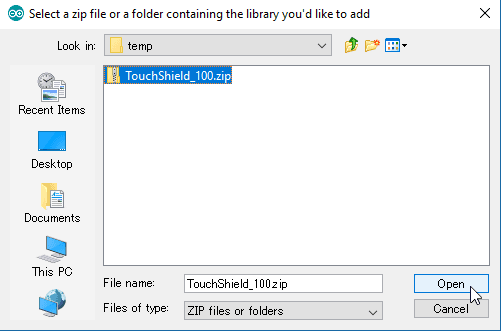
After you select the menu, the following window (Figure 2) appears. Select the .ZIP file you downloaded and click the Open button in the window.
The library has been installed when you see the message, "Library added to your libraries."

A sample sketch is attached to the TouchShield Library. I will show you how to use the TouchShield Library, mainly how to use it with the sample sketch.
First, connect the Arduino Uno to which the Touch Shield is attached to a PC with a USB cable.
Then, run the Arduino IDE and select the File > Examples > TouchShield > sample menu.

Then, you will see that the following sketch is opened.
#include <Wire.h>
#include <TouchShield.h>

TouchShield ts; // when you want to enter numbers
//TouchShield ts('A','B','C','D','E','F','G','H','I'); // when you want to enter alphabets

void setup() {
  ts.init();
  Serial.begin(9600);
  Serial.println("Ready.");
}

void loop() {
  char c=ts.read();
  if(c) {
    Serial.print(c);
  } // if
  // delay(1000); // to test key buffer functionality
}
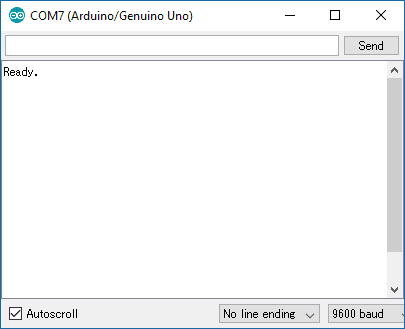
"Ready." will be displayed when you run the serial monitor after uploading this sketch to the Arduino. (See Figure 5)
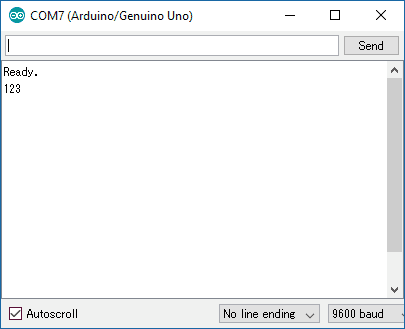
If you touch the keys at this state, the characters assigned to the touched keys will be displayed. For example, if you touch 1, 2 and 3 in turn, the serial monitor will be like Figure 6.
I will give you some description of the sample sketch.
In order to use the TouchShield library, you have to include Wire.h and TouchShield.h as follows:
#include <Wire.h>
#include <TouchShield.h>
The reason why you have to include Wire.h is that you use the Wire library when communicating with the Touch Shield via I2C (TWI).
Next, define an object variable of TouchShield type. Although ts is used as an example here, the variable name doesn't matter. After this definition, you can control the Touch Shield calling the member functions of this object variable.
TouchShield ts; // when you want to enter numbers
Call a member function named init to initialize the Touch Shield before you use it.
ts.init();
Call a member function named read when you read a key.
char c=ts.read();
The read function returns the character that is allocated to the touched key. For example, the function returns '1' when the key 1 is pressed. The function returns '\0' (NULL character).
For the example above, the character that is allocated to the touched key is stored in a char-type variable c.
Although the read function returns characters from '1' to '9', you can change the key assignment.
When you want to change the key assignment, you may pass the characters you want to assign to the keys as the arguments of the constructor. (Separate each character with commas and put them in parentheses.)
TouchShield ts('A','B','C','D','E','F','G','H','I'); // when you want to enter alphabets
In this case, 'A' is assigned to the key 1, 'B' is assigned to the key 2, and so on.
The TouchShield library uses a key buffer which can store up to 16 characters. If you cannot read the key with the read function right after keys are touched, they are stored in the key buffer until they are read. Therefore, you don't have to worry about the unread keys which may occur when the read function cannot be called for a while and when the key buffer isn't used.
If you want to confirm the functionality of the key buffer, remove the two slashes (//) before the delay function in the loop function.
void loop() {
  char c=ts.read();
  if(c) {
    Serial.print(c);
  } // if
  delay(1000); // to test key buffer functionality
}
With the delay function, the read function is called no more than once in a second. However, successively touched keys are all received if they are less than the capacity of the key buffer.
If you confirm it actually, you will see characters are shown with one-second intervals after touching several keys successively.
You probably cannot use other I2C (TWI) devices if you use TouchShield library, although I didn't confirm it.
It is because a key is read via I2C by the ISR that is invoked when the key is touched. If a key is touched when the CPU communicates with another device via I2C, the communication will be interrupted by the key read.
Although I didn't actually try it, another I2C device can coexist with the Touch Shield if you mask the INT0 interrupt that is used by the Touch Shield. In this case, be sure to make the mask period short enough not to fail to read the key.